With the popularity of Single-Page Applications (SPAs) frameworks like Vue.js, React, and Angular and static site generators like Jekyll or Hugo, website no longer need an active server like IIS or Tomcat to host the site. Instead, you just need somewhere to host the files and serve them up from a hostname.
At the end of 2018, Azure added the ability to host static websites from Azure Blob Storage. This becomes a fairly cheap way to host, since you only pay for storage (very cheap) and for network usage (also cheap). This seems like a great option for me when I recently converted a site previously running Wordpress inside an Azure Application Service. I converted the site to a SPA and wanted to host it, using a custom domain, via this new feature.
I ran some proof-of-concents and everything was working great, so I went to make the site live at the custom hostname for the existing site, including a TLS cert to enable HTTPS. This is where everything fell apart. Azure static sites support custom domains and support HTTPS, both through the use of the Azure CDN feature, and even have the ability to manage those certs automaticly via the Azure portal once you validation domain ownership.
EXCEPT for this one little note in the Prerequisites section of the Microsoft docs tuitorial for setting it up:
Important
CDN-managed certificates are not available for root or apex domains. If your Azure CDN custom domain is a root or apex domain, you must use the Bring your own certificate feature.
So if I want to have www.mydomain.com, all is good. But as soon as I want to use just mydomain.com, I can no longer use the built-in automation with Azure, and figuring out how to actually do the "Bring your own certificate" steps was a huge pain in the ass.
My goal here is to document the process I went through to enable HTTPS on a root domain for a static website in Azure storage.
I'm assuming you already have an Azure account and are somewhat familiar with the Azure portal, and that you already have a custom domain that you can manage (via Azure or a third-party provider) to add additional DNS records.
Part 1: Starting with the Static Website
Difficulty: Easy
Time required: Not much
Setting up the static website itself was pretty straightforward, using the auto-assigned domain name. The official documentation from Microsoft walks you through this, but the short version is this:
- Create an Azure Storage Account
- In the Azure Portal, open the
Static websitepane from the Settings menu for the store account - Click the toggle to "Enable" static websites for the storage account
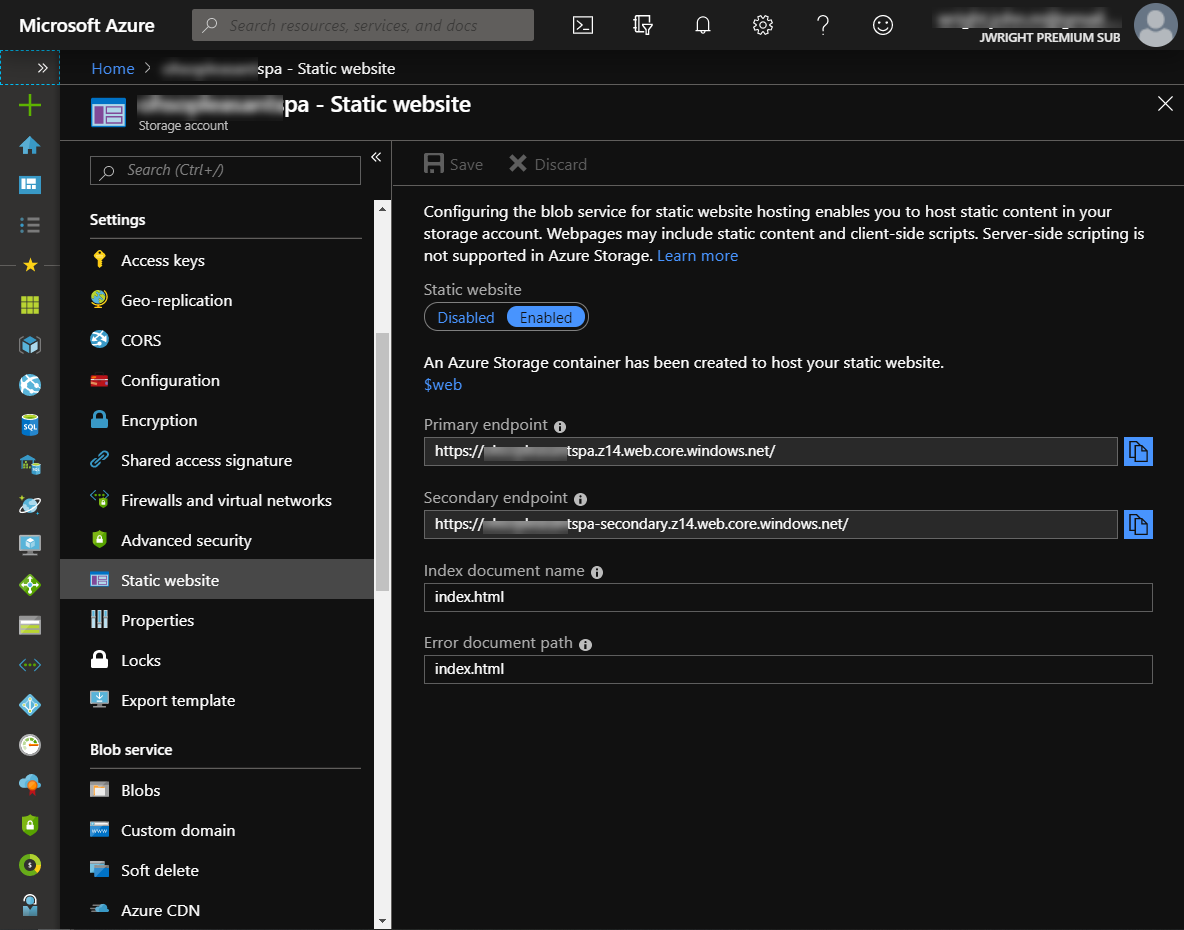
This creates a $web container in the Blob storage area of the storage account. This is the folder that becomes your static site. Azure also creates two endpoints (aka hostnames) that point to this static site. Since we'll be adding a CDN for this site in a minute, we really only need to care about the "primary" endpoint.
At this point, if you created an index.html file in the $web container, you could point your browser at the primary endpoint url and it will serve up that file as if it were being hosted from a formal webserver.
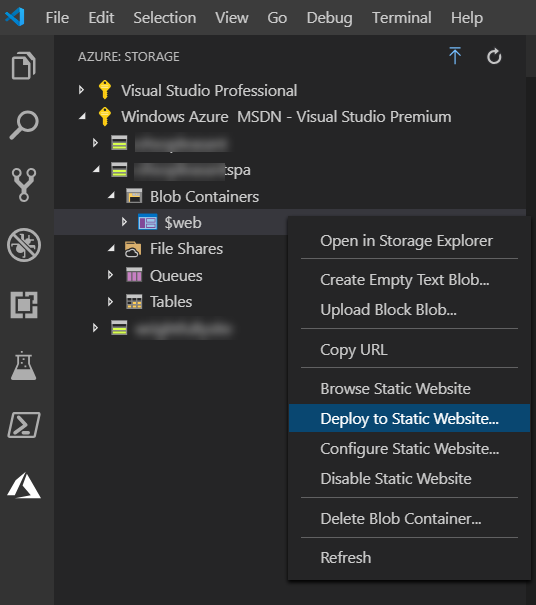
In my case, I'm using VSCode to write my SPA site, and I've added the Azure Storage entension for VSCode. This allows me to easily deploy my site files to my new static website container in Azure by right-clicking on the $web container in the VSCode Azure pane and choosing "Deploy to Static Website..."
Part 2: Adding a Content Distribution Network (CDN) Endpoint
Difficulty: Easy to Medium
Time required: Not much
Great, so we've got a static website up and running, but the website URL is https://mystorageaccountname.z14.web.core.windows.net/ and that's not what I want.
In order to use custom domains (and custom domain certs) with storage-based static sites, you must use the Azure CDN. Again, the official Microsoft documentation is well done, but the short version is this:
- Create a CDN Profile and add a CDN endpoint that points to the "primary" endpoint of your storage account static site.
Important: You must use Azure CDN from Microsoft or Azure CDN from Verizon profiles in order to use a custom HTTPS certificate, which is required for custom root domains. I used Azure CDN from Microsoft.
Pretty simple. You'll get to provide the name you want to use, which will ultimate generate a CDN-backed URL like https:\\mycdnname.azureedge.net.
NOTE: At this point, Azure has auto-genearted HTTPS certs for each of the URLs it's generated, so HTTPS is enabled , but it's using the azureedge.net or windows.net domain names.
Part 3: Use Your Custom Domain for the CDN Endpoint
Difficulty: Easy to Medium
Time required: 5-10 minutes
Now you need to associate your custom domain with the CDN endpoint. As part of this process, Microsoft wants to make sure you actually own the domain you're attempting to use, so you have to do some verifications. There are a handful of ways to do this, including: creating DNS records with specific names under the domain, adding specifically-name html files to website on that domain, responding to an email sent to the address listed on the DNS ownership record.
For me, the easiest route was to modify the DNS records, and I'd suggest going this route for a couple of reasons:
- If you don't actually list your personal contact on your DNS registration (you use some privacy service, for example), then you can't use the email option
- With DNS, you can have the option of using verification-specific entries instead of your production entries, thus allowing you to stage your changes ahead of time without impacting production.
- You're going to have to change your DNS eventually in order to point your domain to the new static website, so might as well do it here.
In this case, the offical docs aren't so good, so here's a walkthrough of what I did:
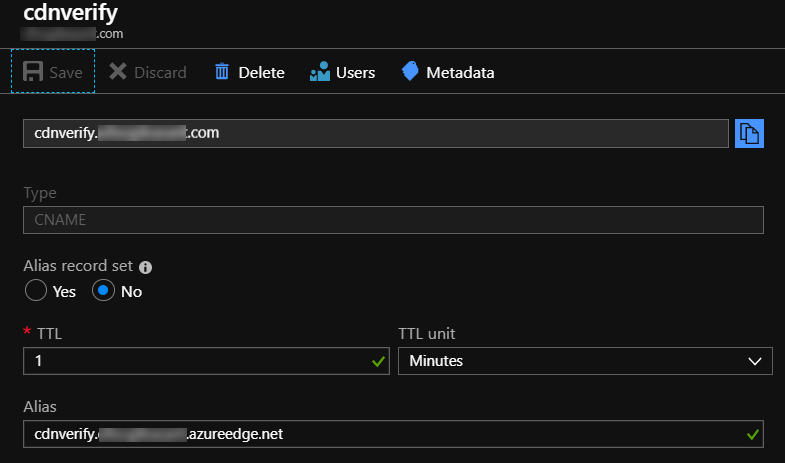
Step 1: You'll need to create new CNAME or AAAA DNS records to either
- point
cdnverify.yourdomain.comtocdnverify.yourcdnname.azureedge.net - point
yourdomain.comtoyourcdn.azureedge.net
By using the cdnverify CNAME, you can confirm ownership without having to change the real DNS yet.
I'm using Azure as my DNS provider for this particular domain, but that's not required. You could use any DNS provider. I would suggest using a very short TTL (Time To Live -- or caching period) for the DNS record, just in case you get it wrong the first time -- otherwise you may have to wait for DNS to repropigate to fix any issue.
Step 2: Once you have the cdverify DNS record (or the main record) pointing to the CDN endpoint, you can move on to adding the custom domain to the CDN endpoint. In the Azure portal, pull up the CDN endpoint record and select "Custom Domains" from the navigation pane. Then click the "+ Custom domain" button.
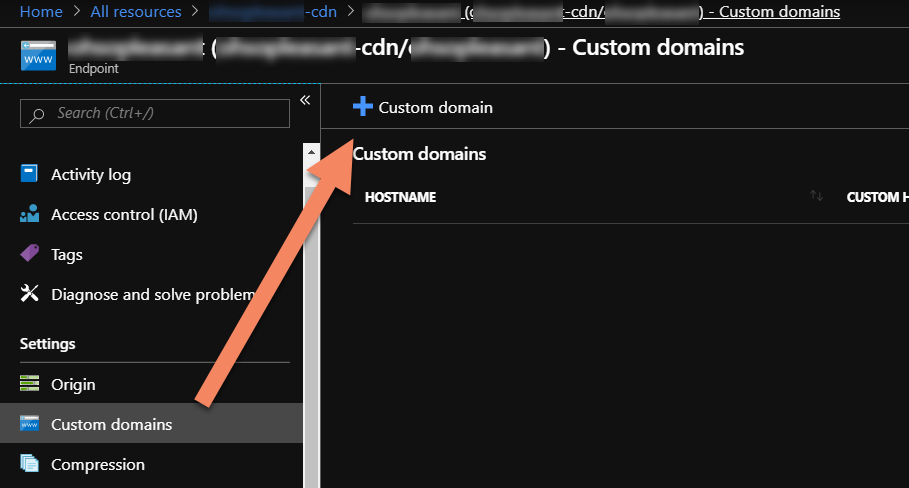
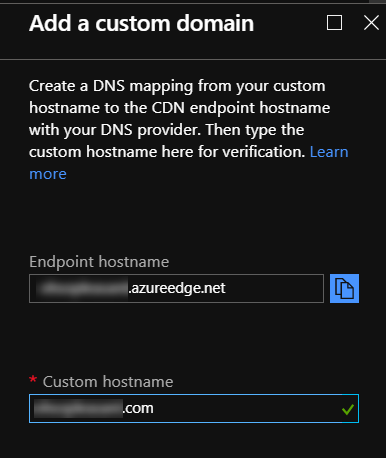
In the "Add a Custom Domain" dialog, enter the actual domain name for your CDN endpoint into the "Endpoint hostname" field (ie: youcdn.azureedge.net), and enter your custom domain name into the "Custom hostname" field. Do not use the cdnverify. hostname -- use the actual hostname.)
As you enter the "Custom hostname" value, Azure will do DNS lookups on what you enter and check that the domain is pointing at the CDN domain, or the cdnverify version of the domain is pointed at the CDN cdverify domain. If that resolution is successful, you'll get a little green checkmark at the end of the input text box. Otherwise, you'll get a red exclaimation point with a mouse-over dialog saying it couldn't do the verfication. If you get the red error mark, first double-check you didn't typo the hostname, then double-check your DNS entries.
Once you get the green checkbox, click the "Add" button.
This will start the background process of creating the custom domain CDN associatation. This will take a minute or two to complete, after which you'll see the entry listed on the Custom domains pane, with "Disabled" in the "Custom HTTPS" column:

Part 4: Enabling HTTPS for Your CDN Endpoint Custom Domain
This is where things start to get ugly.

You have two paths to choose here, Mr Anderson:
If you take the blue pill, you can use a non-root domain (ie: www.yourdomain.com -- note the www sub-domain), and live in a utopian land where Azure handles all the provisioning and renewals of your HTTPS certs for you for free, and you only need to set "Custom domain HTTPS" to "On" for the CDN endpoint, and select the "CDN managed" option. (Just follow the offical Microsoft walkthrough.) The story ends, you wake up in bed and believe whatever you want to believe.
If you take the red pill, you stay in Wonderland, and I show you how deep the rabbit hole goes. Remember: all I'm offering is the truth.
Ok, enough Matrix references.
At this point, you're still here because you either want to use a root domain for your static site, or maybe you have an SSL cert already that you really want to use and manage yourself. So here goes...
In order to use a root domain (like example.com), you must use the "Bring your own certificate" option. This path is not well documented, so I'm going to walk through how I achieved it.
Add your cert to the Azure Vault
Azure won't create a security cert for you for your root domain. That means you have to buy one. I'm hoping this changes, and soon, because in this era of Let's Encrypt giving everyone free certs -- and even Azure giving free certs to any non-root domain -- I don't understand the reasoning for making people pay for these root-level certs.
Do not pay hundreds of dollars for your HTTPS cert! As of Aug 2019, if you go to be "big name" providers, like Comodo (prices start at $88/year) or DigiCert (starts at $207 for 2-year cert), you'll pay too much. You do need to use an Azure-approved cert authority, but I highly suggest namecheap where you can get a single-domain HTTPS certificate for $8/year or a multi-domain cert for about $20/yr. Note: You only need a single-domain, since you only need this cert for the root domain, but in my case I went ahead and got a multi-domain and used it for both the root and www domain. Technically, I could have used a free cert from Azure for the www domain.
The process of getting a cert you can upload into Azure goes like this:
- Create an unsigned cert in Azure Key Vault
- Use that unsigned cert to generate a "Certificate Signing Request" (CSR) from Azure
- Provide that CSR to your certificate authority. Go through whatever process they require to validate your request.
- Take the signed certificate generated by the cert authority and upload it into Azure Key Vault
That's the overview. Here's the details:
Step 1: Create an unsigned cert in Azure Key Vault
Difficulty: Easy
Time required: Very little
Create an Azure Key Vault in the Resource Group with your static website and CDN instances. Within the Vault, go to the "Certificates" pane and click "Generate/Import" button.
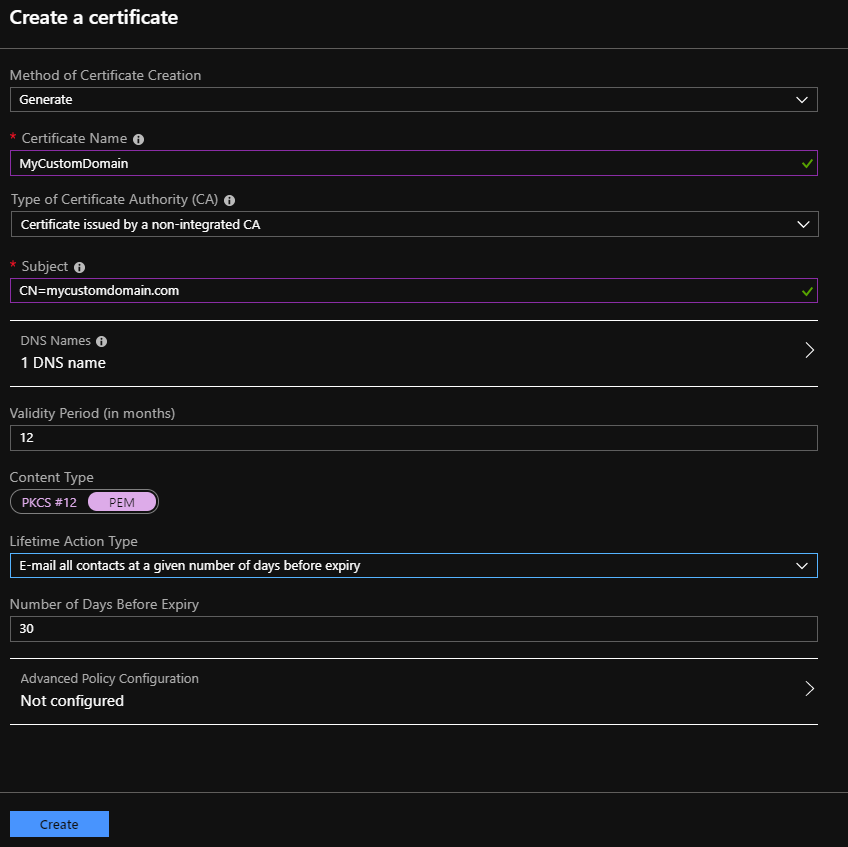
In the "Create a Certificate" dialog, enter the following:
- For "Method of Certificate Creation", choose "Generate"
- For "Certificate Name", pick any name you want to identify the record -- but remove any symbols and whitespace
- For "Type of Certificate Authority (CA)", pick "Certificate issued by a non-integrated CA"
- For "Subject", use
CN=yourdomain.com(ie:CN=followed by your domain name) - Click on the "DNS Names" section and enter your domain. If you want to have multiple domains on the cert (such as the root domain and the
wwwdomain: type one, press[tab]to enter that one and get a new text box to enter the next domain. Once you have all the domains entered, click "OK" - For "Validity Period", pick how long you want the cert to be valid. This doesn't have to match the length you purchaged from your certificate authority -- it can't be longer, but it can be shorter. If it's shorter, you should be able to request an updated cert without charge around the time the current cert expires.
- For "Content Type", check with your cert auth to see what they support, but I would default to PEM.
- For the "Lifetime Action Type" and the reamining inputs, decide how you want the system to notify you when the cert is about to expire. I would suggest having it email you within about a month of expiration.
- Click "Create"
Your cert should be created immediately, but marked as "Disabled".

Step 2: Get the cert signed by your Certificate Authority and upload it back to Azure
Difficulty: Easy
Time required: 15min or more, depending on your CA's turnaround time
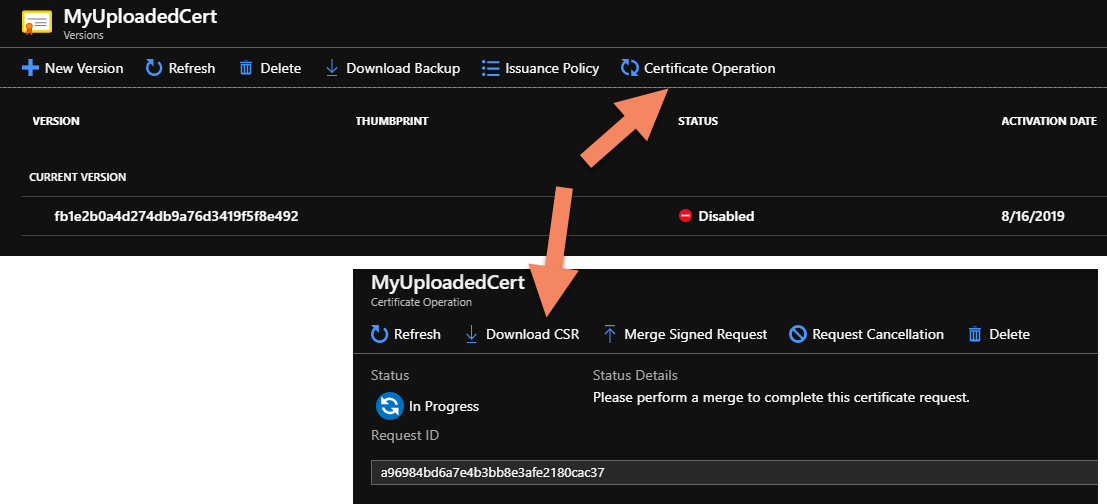
Click on the cert entry to open its details, then click the "Certificate Operations" button. On the resulting dialog, click the "Download CSR" button.
This will download a Certificate Signing Request file, which is basically all of the details that would go into a signed cert, plus some server information. If you want to see the actual data in the file, you can use this SSL & CSR decoder tool.
Now you'll need to hand this CSR file off to your certificate authority. For me, using namecheap as my certificate authority, I had to upload the CSR and then had to add more CNAME DNS entries to prove I owned the domains listed in the cert request. (They provided the instructions for what domains to create and where they should point). Once they are able to verify ownership via DNS entries, it took about 15 mins for them to inform me (via email) that my cert was ready and I was able to download a PEM file that included three entries:
- the CSR I submitted
- the signed cert
- the RSA private key
BE CAREFULL WITH THIS FILE. It includes the private key, so anyone with this file could pretend to be your server. Treat it like you would a password.
You should get that same file from your cert authority. Once you have it, go back to the same screen in Azure where you created the CSR and this time choose "Merge Signed Request" and upload the file with the signed cert and private key. 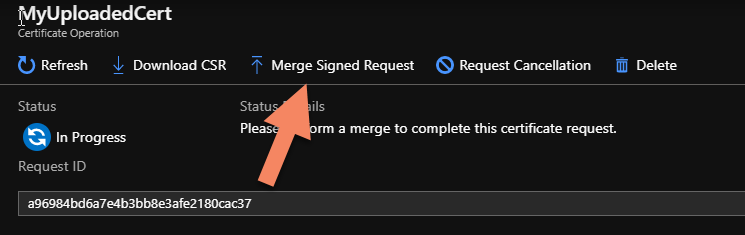
If all goes well, you'll see the cert now listed as "Enabled" 
Give Azure CDN access to your Key Value
Difficulty: Medium
Time required: under 15 mins
The CDN service needs permissions to read from the Azure Key Vault in order to fetch your HTTPS cert. Unfortunately, you can't do this next step in the web portal, so you have to use some PowerShell commands.
Open a PowerShell prompt and run the following:
This will install the Azure AD CLI (Command Line Interface) for PowerShell, which is needed for the next two commands:
Install-Module AzureAD
Authenticate with Azure:
Connect-AzAccount
Give the Azure CDN service account an AD Principal in your default Azure AD instance: Note: The GUID in this command is the same for everyone -- no need to change it.
New-AzADServicePrincipal -ApplicationId "205478c0-bd83-4e1b-a9d6-db63a3e1e1c8" -Verbose
Now, back in the Azure portal, in the Key Vault, select the "Access Policy" pane and click "+ Add Access Policy"
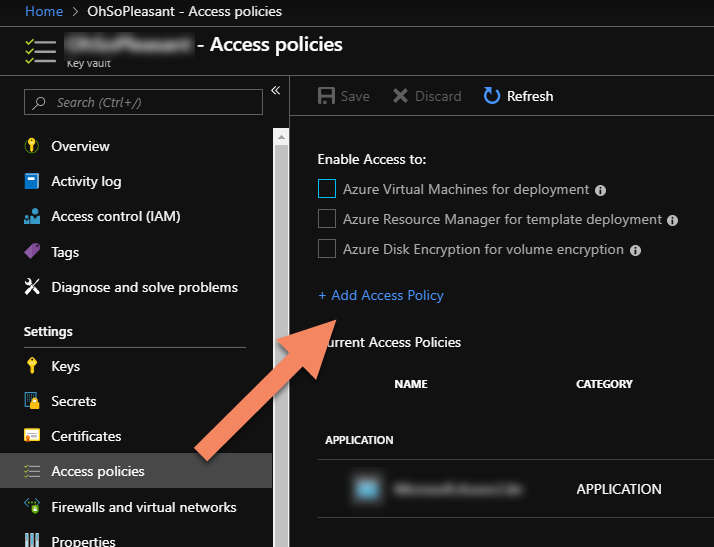
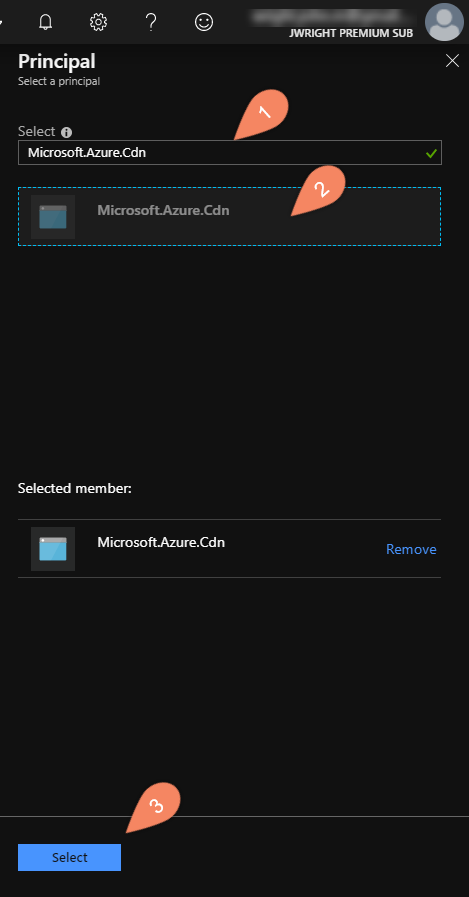
In the "Add access policy" dialog, start by clicking the "Select principal" option. Enter "Microsoft.Azure.Cdn" in the "Select" text input. Click on the "Microsoft.Azure.Cdn" entry so that it shows in the "Selected Members" list half-way down the dialog. Then click the "Select" button.
Back in the "Add access policy" dialog:
- under "Secret Permissions", choose "Get" and "List"
- under "Certificate Permissions", choose "Get" and "List"
Note: The only documentation I could find on this step only mentioned the Secret Permissions -- but it appears the Certificate Permissions were added after that doc was written, and without the cert permissions, the next steps fail. So I'm not 100% certain that the Secret permissions are required, but I do know the certs permissions are.
Now click the "Add" button to save the permissions policy.
Part 5: Associate the Signed Cert with your CDN Endpoint
Difficulty: Easy, if it "Just Works ™"
Time required: Active time: 20 mins. Waiting around time: 12-24 hours, maybe more!
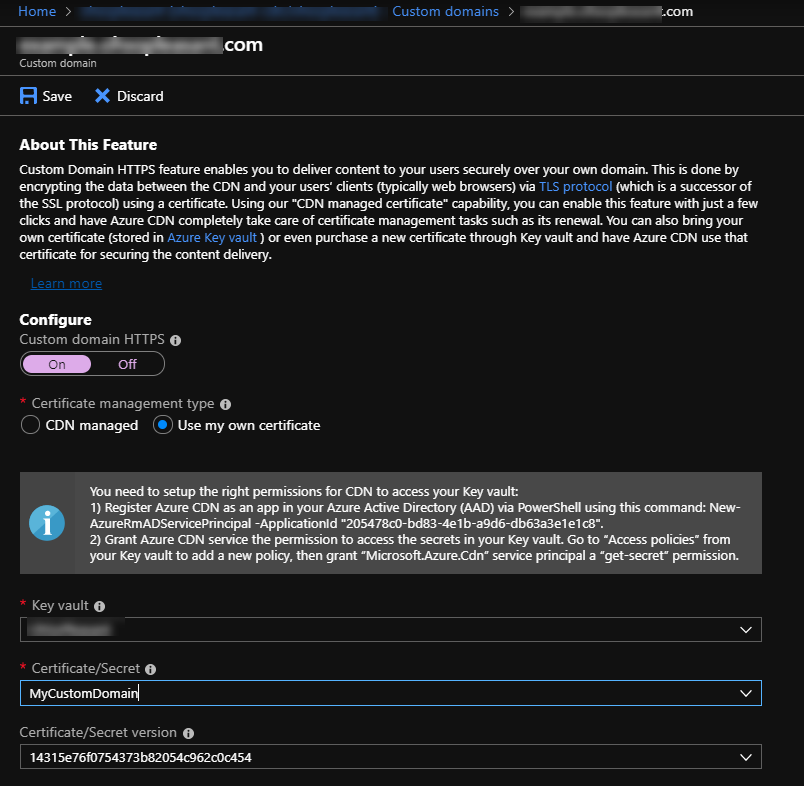
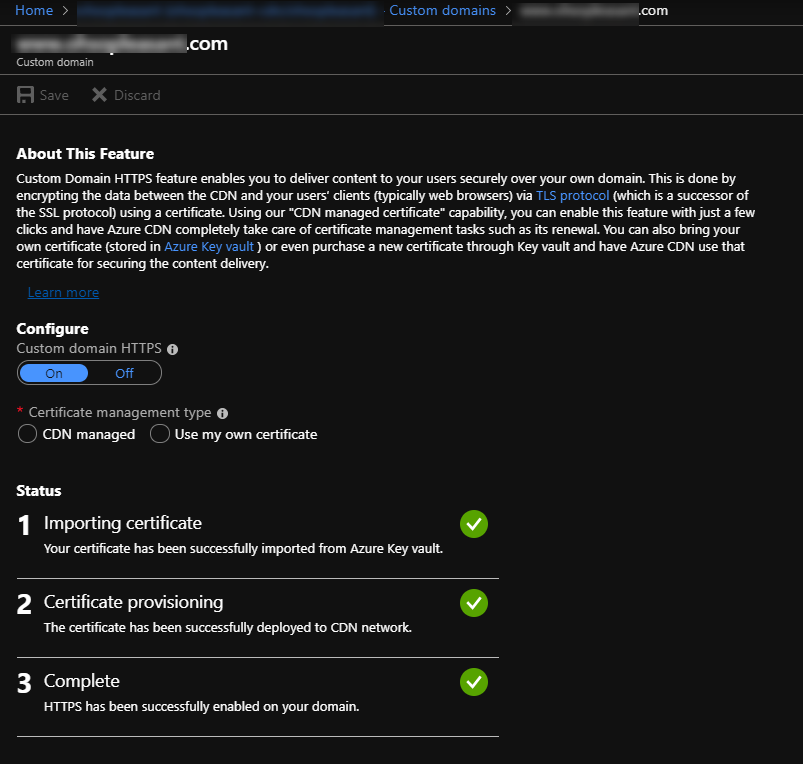
Back in the Azure CDN section of the portal, select the Custom Domains panel and click on the custom domain record that currently says "Disabled" in the Custom HTTPS column.
In the Custom Domain screen, turn on the "Custom domain HTTPS" toggle and pick "Use my own certificate".
In the "Key Vault" dropdown, select your key vault. If you don't see it, then you need to double-check the permissions in the Key Vault Access Policy set in the previous section.
In the "Certificate/Secret" dropdown, pick your cert. The "Certificate/Version" input will auto-populate with the most recent entry for the cert.
Click "Save".
This will kick off the process of enabling the cert for your custom domain. This has two phases:
"Importing Certficate" should take just a few minutes.
"Certificate Provisioning" will take up to 24 hours!!!!!
Each phase will show you the current status and turn to a green checkmark when completed.
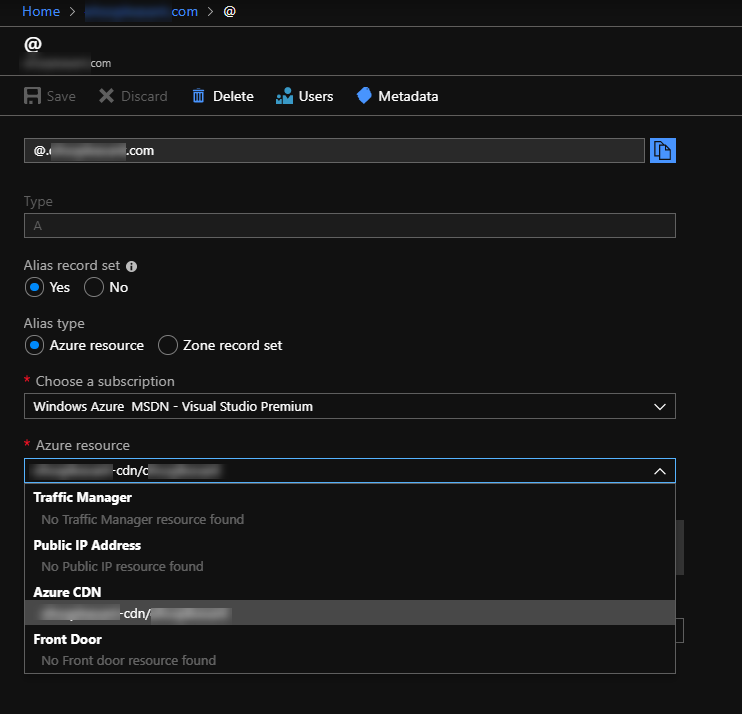
Part 7: Point your DNS records to the CDN
Once the Certificate Provisioning is completed, your static website is all set. Now you just need to go into your DNS provider and change the main DNS record for your custom domain to point to your CDN endpoint's address. If your provider allows you to use CNAMEs, use that, otherwise use the actual IP Address of the endpoint and an A record.
If you use Azure for your DNS provider, they provide a shortcut for A and CNAME records where you can select "Alias record set" as "Yes" and then choose "Alias Type" of "Azure Resource". This will then allow you to select the CDN endpoint you created as the source for your DNS entry. This ensures that if the CDN address ever changes, your DNS record changes with it.
ALL DONE!
That's it. You're all done.
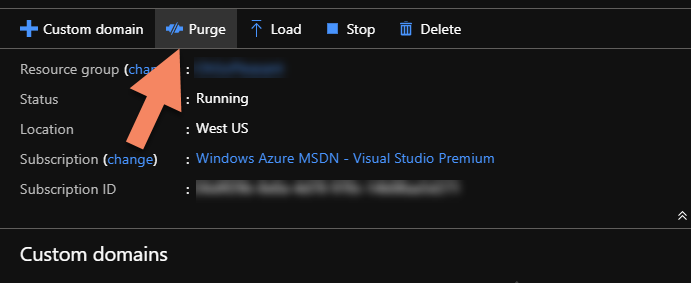
When you push changes to your static website, the CDN will continue to serve up the old copy until the cache expires. You can force it to purge the cache in the CDN section of the portal by clicking the "Purge" button for the endpoint or the whole CDN instance: