This article is one in my series focusing on what I learned creating a Windows Installer using the WiX toolkit’s "Managed Bootstrapper Application" (Custom .NET UI) framework. Each post builds upon the previous posts, so I would suggest you at least skim through the earlier articles in the series.
Here’s an index into the articles in this series:
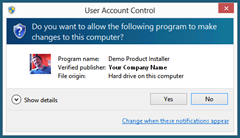
UAC, if you're not familiar, is the feature in Windows where applications that need elevated permissions will "ask" for it by having Window pop up a "This app is trying to do something serious -- Do you want to allow it?" dialog, while completely blocking out the rest of your desktop. Many installers require UAC, because they install "Machine Wide" (ie: not specific to just the current User).
In the world of installers, there are two basic camps: force the permission elevation up front or request it only when you need it. The former is easier, the latter is what Microsoft wants you to do. The big catch: you can only request elevated permissions when you start a process - so once a process is already loaded, you can't elevate it. Instead, you must start up a new process and use inter-process communication to feed data back and forth.
In other .Net apps, to force the elevation up front, you just create an assembly manifest file with the appropriate markers. However, the manifest in this case is actually associated with the WiX engine and you can't just change it. If you try to extract the manifest using the typical .net tools, modify it and reattach, it changes the byte signature of the assembly, and it appears that WiX uses hard-coded byte offsets to determine where the embedded files are located. The result: changing the manifest causes the engine to fail to find your assemblies. You could download the WiX source code, change the embedded manifest file, recompile, etc. Be careful, though -- I'm not a lawyer, but I believe the WiX reciprocal-style open source license would require you to open source your installer code if you go this route.
For the most part, the MSIs are the only parts that will need elevated access, and WiX takes care of all of that for you. The only time you really need to worry about it is if you need to do something in your bootstrapper itself that requires elevated permissions (such as certain Registry operations, IIS operations, etc).
Also note that the base class exposes an Elevate() method. This will force the WiX engine to spin up the elevated process it uses for running the MSIs when you call it (assuming it hasn't already been created). It does not elevate the current process (ie: your code). Sorry.
There are a couple of other notes:
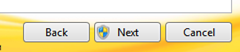
If UAC is in play, it is suggested you show the little "shield" icon on the button that immediately precedes the action that will prompt for elevation. But if UAC is not enabled, you shouldn't show it. So how do you know if you should show the shield? That's pretty easy, actually. There are two rules:
- The operating system supports UAC (is a version after WinXP). Here's a little helper to make that determination:
/// <summary>
/// True if the current operating system supports UAC.
/// Vista or higher only.
/// </summary>
internal static bool OperatingSystemSupportsUAC
{
    get { return Environment.OSVersion.Version.Major >= 6; }
}
- The process is not already running in administrator mode. If the user choose "Run as Administrator", or if it was started by another administrator process (such as the Add/Remove programs control panel), then it will not need to ask for elevation permissions. Here's another helper: (add
using System.Security.Principal;to your file)
/// <summary>
/// True if the current user is in the Admin group, or the process
/// is already running with elevated permissions.
/// </summary>
private static bool UserIsRunningAsAdmin
{
    get
    {
        var principal = new WindowsPrincipal(WindowsIdentity.GetCurrent());
        return principal.IsInRole(WindowsBuiltInRole.Administrator);
    }
}
So, add them together, and you get this:
var ShieldDisplayRequired = OperatingSystemSupportsUAC && !UserIsRunningAsAdmin;
Getting access to the actual shield and putting it on a button is another issue altogether. I used a combination of the concepts raised in these two postings, along with some special sauce of my own, which I won't repost here. But you should be able to get a good start from these links:
- http://sohotechnology.wordpress.com/2009/11/22/displaying-the-uac-shield-in-wpf-with-an-adorner
- http://www.peschuster.de/2011/12/how-to-add-an-uac-shield-icon-to-a-menuitem
Note, though, that if your installer is not also signed, then the UAC prompt will alert the user that the installer is untrusted. To really do this right, you should sign the installer too, but there’s a couple extra steps you must take to do that. I’ll post about that separately.